Apple Slice With Nut Butter & Maple Drizzle (Gluten-Free, Paleo, Low-Sugar)
Servings: 8 servings
Print
Pin
Save
Calories: 324kcal
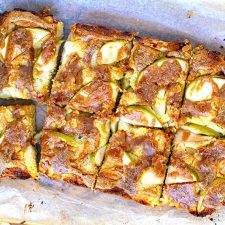
Learn how to make delicious baked apple slice with peanut butter maple drizzle to enjoy cold or warm, by itself or with a dollop of cream, ice cream or yoghurt. This apple pie and blondie crossover slice is gluten-free, grain-free, dairy-free, low-sugar and low-carb and paleo-friendly. It's made with almond meal, coconut flour, a little tapioca, green apples and sugar-free sweetener.
Ingredients
For the slice batter
- 2 large green apples 1 peeled and cut into small cubes and one sliced into thin wedges
- 3 large eggs
- 1 tablespoon nut butter I used peanut butter
- 1 teaspoon vanilla extract
- 90 g coconut oil melted and cooled (about 1/2 cup)
- 1 cup almond meal (110 g)
- 1/2 cup coconut flour (60 g)
- 3 tablespoons tapioca flour or cassava flour
- 1 teaspoon baking powder
- 1/3 cup Natvia sugar-free sweetener sugar alternative, see notes
- 1 teaspoon cinnamon powder
For the topping
- 2 tablespoons nut butter I used smooth peanut butter
- 2 tablespoons maple syrup
- 1/4 cup almond milk or coconut milk
Instructions
- Preheat the oven to 180 C / 355 F.
- Grease a large piece of parchment paper and line a 7 x 11-inch (18 x 28-cm) slice tin or brownie tin. Set aside.
- In a large bowl, add the eggs, nut butter, coconut oil and vanilla. Whisk until smooth and frothy.
- Add the rest of the ingredients and whisk briefly. Swap to a spatula or a spoon and add the cut up apple cubes. Mix well.
- Transfer the slice mixture into the prepared tin and spread evenly with a spatula or a spoon. Use your fingers to press the mixture into the corners and moves some of the apple pieces around for even distribution.
- Place the thinly sliced apple wedges on top in whatever pattern you like. I used maybe half of the slices but I reckon it would be even better with more apples on top, so use up all the sliced apples. Gently press the slices into the batter.
- Bake in a moderate oven 180 C / 355 F (160 C fan-forced) for 20 minutes.
- In the meantime, whisk together the nut butter, maple syrup and milk. At first, it might seem like the mixture isn't mixing properly but use a fork or a whisk and vigorously whisk it for a little longer and it will all incorporate and thicken nicely.
- After 20 minutes, remove the slice tin and drizzle the nut butter and maple sauce over the top. Pop the tin back in the oven for 15 more minutes. The total cooking time is about 35-40 minutes.
- Once done, remove the oven and allow the slice to cool in the tin for 15-20 minutes. Then gently lift the slice out of the tin and pop on a cutting board. Slice into square or rectangular shapes.
- Serve as is or with some coconut yoghurt or ice cream, or double cream.
Video
Notes
Sweetener: I used Natvia granulated sweetener (perfect for baking), which is a mix of stevia and erythritol. You can use Sukrin brown sugar alternative, Swerve or Lacanto zero-carb sugar or any other brand you like. Coconut sugar can also be used.
Nut butter: I love a bit of peanut butter so that's what I used but you can swap for almond, cashew, macadamia, hazelnut or anything else you like. It's really there to give some creaminess and thickness to the glaze/drizzle. You can even leave it out!
Lower carb version: Use sugar-free syrup alternative instead of maple syrup.
Nutrition
Calories: 324kcal | Carbohydrates: 23g | Protein: 8g | Fat: 24g | Saturated Fat: 12g | Polyunsaturated Fat: 1g | Monounsaturated Fat: 3g | Trans Fat: 0.01g | Cholesterol: 70mg | Sodium: 107mg | Potassium: 144mg | Fiber: 6g | Sugar: 10g | Vitamin A: 132IU | Vitamin C: 3mg | Calcium: 111mg | Iron: 1mg
Tried this recipe?Mention @cookedandloved or tag #cookedandloved