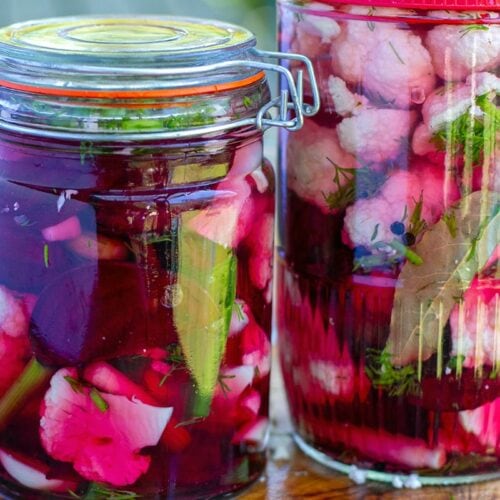
Fermented Beets & Cauliflower With Garlic & Dill
Servings: 2 litres
Print
Pin
Save
Calories: 212kcal
Learn how to make lacto fermented beets and cauliflower with saltwater brine, garlic, and dill. This how-to recipe can be used to ferment most vegetables. Lacto-fermented pickles are great as a side dish or a condiment with any meal and look fantastic on an antipasto platter or snack board. Full of gut-healthy probiotics and a great way to preserve surplus veggies.
Ingredients
- 2 large beets peeled and sliced into thin wedges
- 1 head cauliflower cut into florets and each floret cut into halves or quarters (depending on size)
- A handful of dill chopped
- 2 spring onions cut into 1-inch pieces (scallions)
- 6 cloves of garlic peeled and sliced into 2-3 pieces
- 1 teaspoon whole peppercorns
- 4 bay leaves
- 1000 ml water
- 2 tablespoons salt
- 2 x 1-litre jars with tight lids and maybe 1 small one
Instructions
- Find the full list of ingredients in the recipe card below. Here is a step-by-step process with photos to guide you along.
- You will need two 1-litre jars with tight lids (and maybe 1 extra small one) for the amount of beetroot or cauliflower used.
Preparation
- Wash the jars and the lids in hot water with soap or dishwashing liquid and rinse well. Place upside down on a towel to drain.
- Prepare the vegetables, herbs, garlic and spices. Peel the beets and cut them into wedges. Wash the cauliflower and cut it into small florets.
Stuffing the jars
- Add 3 garlic pieces and peppercorns, a sprinkle of dill and 2-3 spring onion pieces to the bottom of the jar. Top with a layer of cauliflower and beets. Add more dill, spring onions, garlic and peppercorns and one bay leaf. Continue filling the jar in this fashion, finishing with one more bay leaf right at the end. You should use up half of the garlic, spring onions, dill and peppercorns.
- Fill the jar to the top very tightly but leave 1.5-2 cm space between the lid and the vegetables.
Make saltwater brine
- You will need about 500 ml to 700 ml (2-3 cups) of the salty brine but this will depend on the size of the jars (you might use 2 very large jars or 1 large and 2 small jars etc). The more stuffed the jar is, the less liquid you will need to submerge all the vegetables. I usually make more saltwater brine than I need.
- I usually mix 1 litre of water with 2 tablespoons of salt (20 grams). You can always make extra brine if needed or discard the leftovers. Allow the salt to dissolve completely.
- Pour in the salt brine in the jars to submerge the vegetables. I like to fill it almost to the top but leave about 1/2cm of space between the liquid and the lid. Use your fingers to press down on the vegetables to make sure they are well underwater.
- Pop the lid on top and close tightly. Store the jars in a warm place away from the sun or direct light. Make sure to put them on a plate or a tray to catch any fermenting juices that might escape the jar.
Fermentation stages & how to check on your vegetables
- Allow about 48 hours for the initial fermentation to begin. During this time, some bubbles may form and the pressure in the jar will start to build up. This will push the liquid to the surface. This process can take between 36 hours to 72 hours depending on how warm it is and how much salt you used.
- Check after 36 to 48 hours to see it feels like the pressure is building up. Gently open the lid and if you hear a hissing release sound, then you know that some of that pressure is coming out. This is called “burping the jar.”
- If there is too much liquid (all the way to the lid), discard a tablespoon or two. Press the vegetables down again as they often surface to the top. We want to submerge everything to eliminate as much oxygen as possible. Some people use weights on top of the vegetables to keep them down.
- After the first 48 hours, the fermentation will be pretty active; check and burp the jar every 24 hours for the next 2-3 days.
- Once it feels like the fermentation isn't producing as much pressure and bubbles, you can leave the jar alone for a few days to allow the veggies to ferment slowly and develop more flavour. The longer you leave them, the more sour/tangy they will get and softer in texture. I find that with sauerkraut and kimchi, they are ready to be moved to the fridge and for consumption after about 7 days. However, with vegetables that are fermented in saltwater brine, they are better after 10 days.
- Taste the vegetables after 7 days. I prefer them a little crunchy so I move them to the fridge as soon as they are tangy/sour enough. Once in the fridge, they will continue to ferment at a very slow rate and can be kept for a few weeks if not longer.
Notes
- Salt to water ratios: Typically a 2% salt to water brine is used for fermenting harder vegetables such as beets, cauliflower, carrots, onions, radishes and garlic.
- For softer vegetables with higher water content, such as cucumbers, capsicum (bell peppers) asparagus, and zucchini, a 5% salt to water brine is recommended. For example, for 1 litre of water (1000 grams on the scales), I would multiply 1000*0.02, which is 20 grams of salt (2%). That's about 1.5-2 tablespoons depending on the salt granules.
Nutrition
Serving: 1 litre | Calories: 212kcal | Carbohydrates: 46g | Protein: 11g | Fat: 1g | Saturated Fat: 1g | Polyunsaturated Fat: 0.3g | Monounsaturated Fat: 0.2g | Sodium: 7304mg | Potassium: 1845mg | Fiber: 14g | Sugar: 24g | Vitamin A: 235IU | Vitamin C: 157mg | Calcium: 162mg | Iron: 4mg
Tried this recipe?Mention @cookedandloved or tag #cookedandloved